Showing posts with label studio. Show all posts

Thursday, February 20, 2020

How I make dolls from custom printed fabric

I thought it might be helpful to make a post about how the majority of my dolls are made. Both for people who buy my dolls, and wonder about it what goes into it, and for people who are trying to make their own dolls.

I just took pictures as I was making a Batcat doll that I sell in my Etsy shop.

https://www.etsy.com/ca/listing/574771618

This is my character, which I do a lot of different things with. This doll was designed in Adobe Draw, which I used on my iPad Pro. In reality, most of my dolls are being designed in Procreate on the iPad now. But the process is pretty similar.
Here is in the the app. Its a very simple design. I decided on the body shape and the arms and legs, tail and wings.

Its very easy to get clean black and white designs with this app. You can see I keep things on different layers so I can move them around.

Ok this isn't really a pattern design tutorial, so I am breezing past all the hardest and most important bits of doll making, which is designing the doll and getting everything worked out! I often make a pattern, have it printed, sew it,  then make corrections. Once in a while a doll comes out perfectly but, in my experience there are always some tweaks you want to make.
So obviously if you are going to me trying to MAKE your own doll, expect it to look wonky, too fat, too skinny or something the first time you make one. Its just how it goes.

Ok next step after you draw the doll parts. I upload the image I drew in Adobe Draw to Photoshop on my desktop computer.  I add a light outline and a bleed in the same doll colour around all the pieces. The "outline" isn't necessary if your doll is a more simple design, like straight legs or round head, but for designs that have detail, like those little bits on the side of the batcat's head, I find the outline helpful. I will show you why later on. 

 So once all the doll parts have their bleeds, its time to assemble them in a file to be printed. You can get fabric printed at Spoonflower, which has a lot of different options, so deciding what kind of fabric you would like FIRST before designing this layout is helpful, as they are different sizes. This layout below is for a Fat Quarter (1/4 yard) of Minky fabric.

 You can see there is a front and a back, and each arm and leg and the tail also has a front and back, which are mirror images of each other. The wings are the only part of the doll that one have one piece as I add faux leather as the back. Also a lil seal friend!

You can choose to have only this Fat Quarter printed or you can fill up a whole yard and you get more bang for your buck.
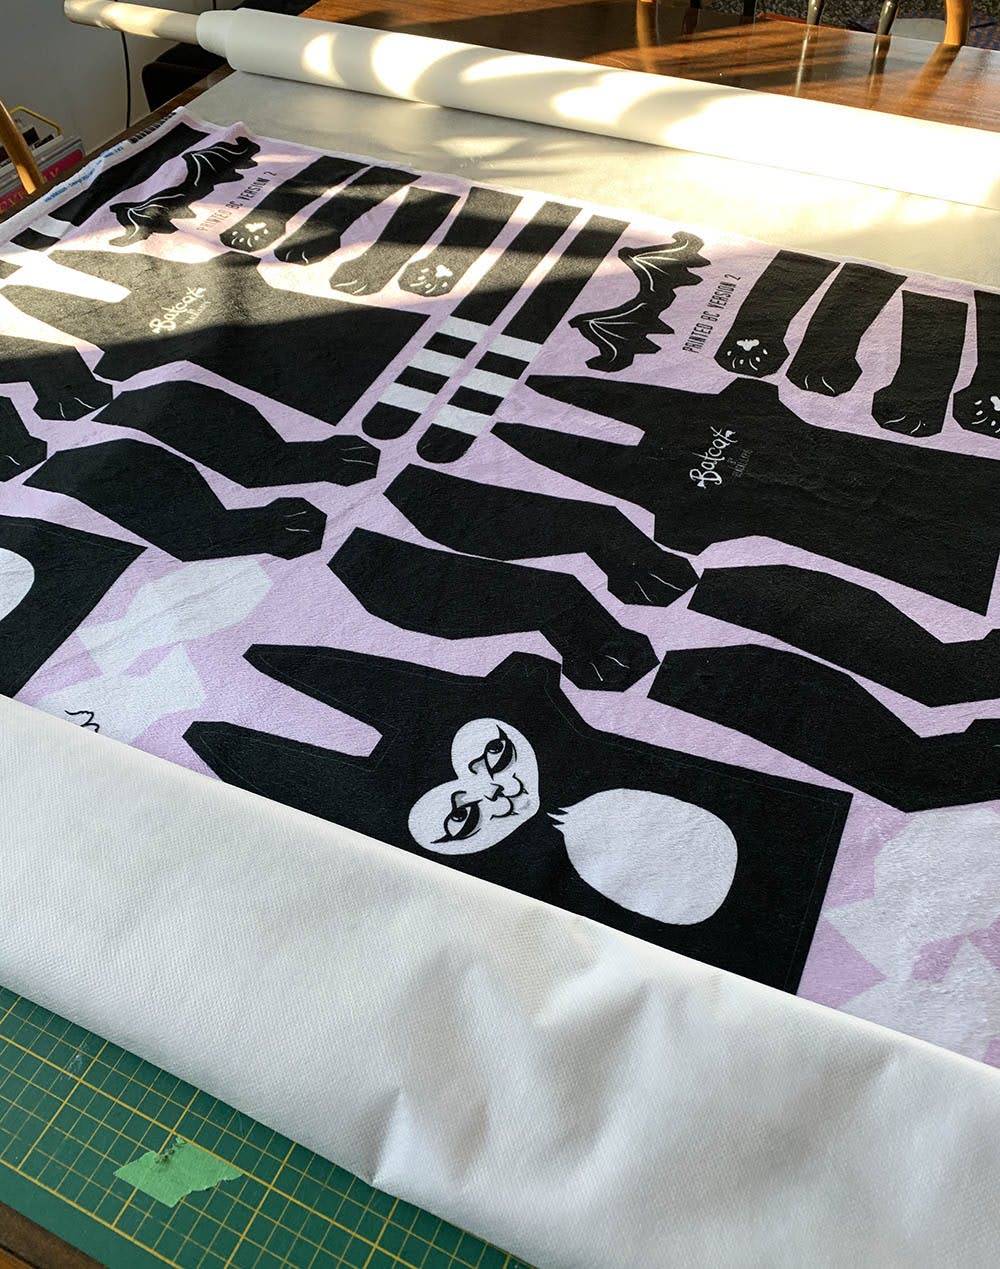
Ok our fabric has arrived! You can see I get it printed by the yard. I wash and dry the fabric as suggested by the manufacturer. Minky looks the exact same after washing. 

Next step I take is backing it with interfacing, which you can see on the roll at the top of the photo. Why do I use this? Minky feels really nice and soft and fuzzy, but its a PAIN to sew. It stretches and is super slippery. It also lets fibers from your stuffing poke through your doll, which when the doll is black looks SO BAD. This solves all these problems and is cheap and easy and will make your life better. You can use any interfacing really I use a sew in one, but I actually spray it with temporary quilt adhesive to make it stick while I am making the dolls. 

I then cut all the pattern pieces out quickly, I will cut some of them out more carefully later as I sew them.
I am going to sew and stuff all the arms, legs, tail and wings before I sew the body.

Here are two parts of an arm. If this was a simple doll with a round hand i would simply pin them together and sew around the edge. 

But this Batcat paw is a bit more complex, he has little fingers. How do I sew that? Well I use my little USB powered lightbox (or I used to pop it up against the window) to trace the outline that I had added in Photoshop to show me where to sew. Another way is to actually sew around the outline on just the top paw piece, which will transfer your line the bottom of the interfacing. 

 I have started using quilt clips to "pin" everything lately and its way better and way faster and just amazing?!? Minky is soooo slippery and these little clips hold on super tight. You can buy them for cheap online, my local Fabricland store has them for 5x the price I paid. 

So I match up the two paw pattern pieces by cutting out the one I traced the sewing line on, and matching it to its partner. I then clip it all and sew around it, leaving the end open for stuffing.

You then have to trim all around it and *carefully* snip into the fabric at every curve so when you turn it right-side out, the fabric can stretch and not bunch up. Just snip carefully in between those batcat toes. Leave about 1mm not snipped so you don't hit your sewing line.


 Here is one turned right-side out. You can see the tools I use for this. I have a Letraset rubbing tool that I have literally used on every doll I have ever made, I stole it from my dad when I was a teenager. Guess its *vintage* now. If you want something like this, there is a tool called "That Purple Thang" that is really similar. I also often use a little pair of pliers along with the Letraset tool. Minky really slides against itself well, so turning things right-side out is actually really easy.


I do the same process with the wings but use a piece of faux leather. This is really unforgiving and a total PAIN to turn right-side out. Do not recommend. Also cannot use pins at all with this fabric, as the pin holes will show. So right sides together, sew around the shape and leave a little place for turning right-side out.


 All the parts are sewn and stuffed (plus a bunch of random other Crow doll legs.) After they are stuffed I quickly sew the tops closed. No need to be careful or pretty about it as that part is hidden inside the doll.


Moving on to the body of the doll. I have started attaching the dolls wings and tail at this stage, but you can certainly do it after by hand sewing them on. I did that for most of my dolls for years.
You cans see that Minky fabric makes TONS of fuzzies. Your house and clothes will be a mess.


Ok If you haven't made a doll before, here is probably where you are like, what is happening?? 
I have matched up the front and back body of the doll and sewn around the perimeter BUT leaving arm and leg holes. PLUS I left one small opening (look where the tail is coming out of the side of the body) open for stuffing. Make sure if you attached things like the wings or tail already that they don't get caught up inside when you sew. 

This part can get tricky.  Since you are making this doll inside out, legs and arms can easily get sewn in backwards. Take a minute with each doll part you sew in and think about how it will be when it is turned the right way out. I honestly some times have to  think of my own body folded like this doll is. I have made hundreds of dolls by now and I can still make errors.

You can think of it like "the front of the legs should be touching the front of the body" while I am sewing it. Same for the arms. You will understand when you do it the wrong way round by accident!


Here is where I am going to add the leg. Imagine this same position, but the leg is stuffed inside the doll. I then sew across the line I have traced.


This is the point where you will become super annoyed. (And also start thinking, why did I decide to make a blog post about this mess??) Anyway, each arm and leg has been sewed in its proper place, and each one makes it more difficult as there is only so much room in an inside-out doll. But just sew one one at a time. You may need to have some arms and legs poking out of the stuffing hole while you sew. 
 THEN clip the curves like you did with the arms and legs, this is super important and the doll will not look nice unless you ease any curves. 

Then pull them all out through the hole while you hold your breath.....
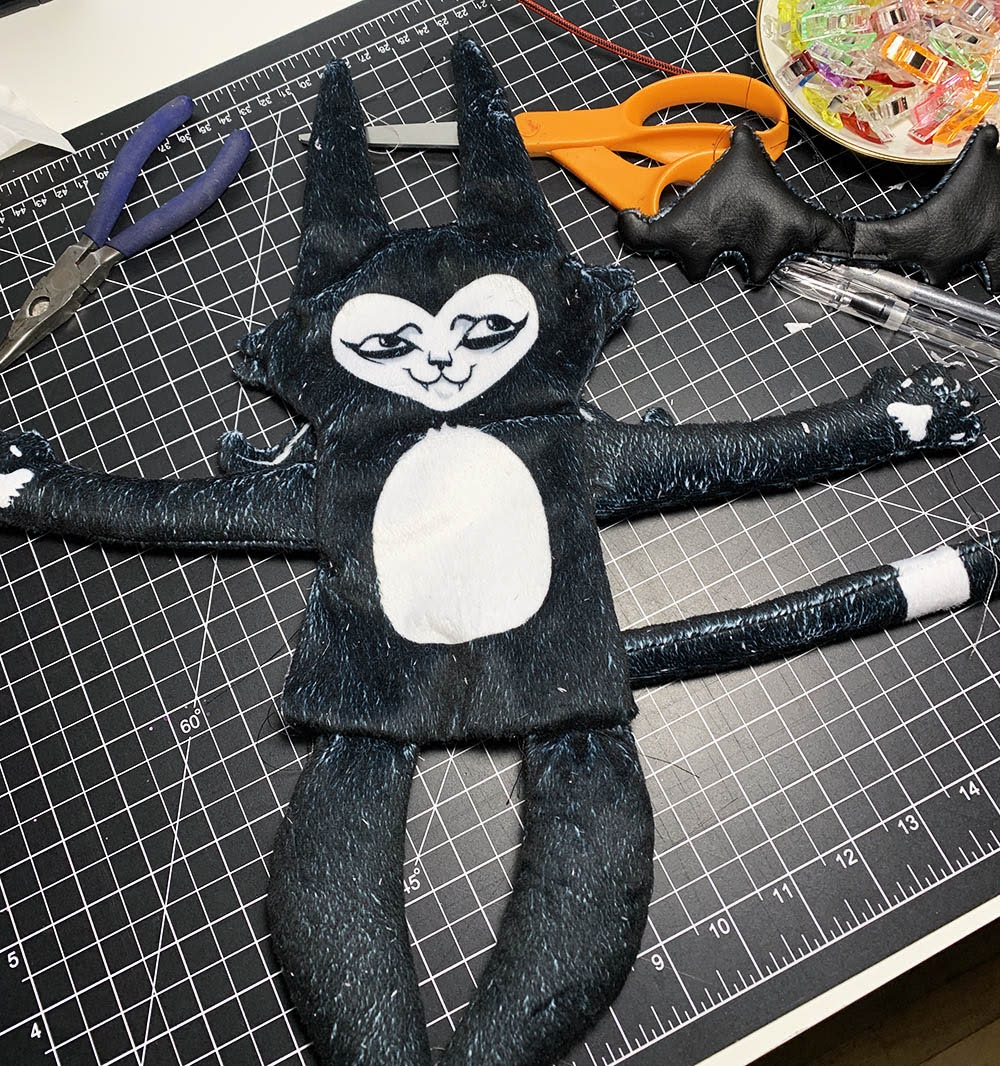

PHEW! Everything is in the right place and it looks great! Its the evening now so the photo makes it look a bit scruffy, but you can brush him up a bit and it all gets nice and black again. Now just stuff through the stuffing hole you left, and do a nice and neat stitch by hand to seal up the hole. Minky is pretty forgiving in this way as well.


Here it is! 

Hope this helped you understand how my doll is made. I have made A LOT of them, but I use only a normal household sewing machine and you can get all these materials at your local fabric store. You could do the same sort of doll and give it a hand sewn or drawn face. If the "sewing the legs while inside out" part is super scary, just hand sew the legs on the outside. 

Just remember you can use the seam ripper if you do something wrong! I certainly do. 


Friday, June 27, 2014

Papier Mache Bat with Donut

That damn bat just stole my donut.
Papier Mache Bat and Donut (blacklilypie.blogspot.com)
I just finished and listed this papier mache bat with a wire skeleton. The donut (and his feet) are hinged to his body, so it kind of swings back and forth.

Here are some process photos...
My super elaborate idea sketch. Hahaha.

Papier Mache Bat and Donut process shot (blacklilypie.blogspot.com)

I really should have taken one at the skeleton stage, but anyway...Here is his unpainted body when I was adding the feet. I Added another few layers of papier mache and then sanded it.

Papier Mache Bat and Donut painting shot (blacklilypie.blogspot.com)


Base coats.

Papier Mache Bat face painting shot (blacklilypie.blogspot.com)
I drew his face with a pigment liner then put a coat of white overtop for there is just a faint guide to paint from. 

Papier Mache Bat face painting shot (blacklilypie.blogspot.com)

I think this is almost the completed face. I used like, the tiniest brush I had, and then cut most of the bristles off to make it tinier. Then sealed it with varnish before doing the rest of the sculpture. 

bat wing painting resist shot (blacklilypie.blogspot.com)
The wings I gave a weird crack/resist effect. You only get one shot at it! Painting over a wet layer, so it kind of breaks and resists the paint as the bottom layer dries. Also because he is not flat I basically had to do each wing segment at a time so it wouldn't all run everywhere. Lots of interesting imperfections.

papier mache donut (blacklilypie.blogspot.com)

The donut looks pretty good in real life. Adding a few coats of gloss always helps food art. heh heh.

papier mache bat holding donut (blacklilypie.blogspot.com)
He hangs from an invisible wire that attached to his wing tops. I designed him to be viewable from all sides, so you could hang him from a ceiling.

Its always fun to make these papier mache work, but it takes FOREVERRRR because you have to wait for each coat of stuff to dry. Like,  this was hanging around for weeks. Turned out cute in the end though. He is here.

I want a donut.

Monday, September 12, 2011

shussshhh shusshhh

Sooo...a good thing about moving to Ottawa, I finally got an "when we move to Ottawa present."

AWWW YEAHHHHH.
New tablet! 
My old one has a crack in it, is GROSS and the mouse double clicks randomly and doesn't scroll and it is OLD AS HELL and DYING. My new Intuos4 is like, too cool for school next to that 10 year old (at least) thing.

The new one makes a nice marker-like shusssshing sound when you draw. Plus it has programmable keys and all sorts of nibs and its all like black on black on black like Batman's tablet would be. Yes.......

So I am getting used to it. I have never drew things from scratch on my tablet, I scan in pencil drawings or inked stuff and go from there. Might change now.

Want to see some sneak peek stuff?


There.
These are works in progress, I am still working on colours and packing ideas and other parts of the projects. You know, just making crap up as I go along.Heh hehhhh.

Oh, and I asked Nathan to take a pic of my in my studio, you know, so I can be current and not be a liar with outdated profile pics on the internet. This is the BEST one!
There must be a deadly herp derp leak in this studio. hahaha.

Friday, September 9, 2011

I moved to Ottawa... It's a big deal.

 So, packing up my old studio (which I was not supposed to do, the movers were supposed to, but no way man!) was kind of sad. I am moving to Ottawa because of my partner being relocated in his government job. Ottawa is the capital of Canada for you non-canucks. But its smaller and more dull than Toronto.
The movers packed (and overpacked) everthing we owned, and we had to squat in our entirely packed house for a night and it was weird.
 Rocko the Cat did NOT like going in the car. Six hours of an insane, freaking out, panting little nightmare. He took it out on my by constantly gouging my flesh when i tried to wrestle him from under the gas pedal.
 We had to squat AGAIN because the movers were delayed a day. It wasn't bad actually, its like camping with a kitchen and no bugs.
Then they delivered all our furniture and we had about one billion too many boxes for our new smaller apartment. UGHHHH.
Rocko the Cat was in a constant state of terror for days. He won't eat or drink or walk normal (slinking around) and he hides constantly and I keep losing him and thinking he jumped out the window or flushed himself down the toilet.
We eventually get ourselves out from under the mountain of stuff we own for some reason, and are playing adult and putting things on shelves.
 My studio is a nice greyish pinky purple. I painted it before the landlord told us not to paint anything because it cost him so much money to paint the whole place beige. (Um, I cannot live in a beige house! CAN NOT.) We may have to fight to the death.
Ok, so now my "Woe is me, I am moving to Ottawa so I can't make bookmarks and stuffed dudes!" period is coming to an end. Back to work in my illicitly purple studio.


P.S.
-Ottawa is small.
-There are crickets and squirrels being noisy all day.
-Kids. Every person has a baby every 5 months here.
-I don't have cable anymore. SUCKS.
-Do people really put up paintings with those Command Adhesive things? NO ONE DOES THAT, LANDLORD. I need wall anchors for my heavy ass art.
-Oh yeah, back to work.

Tuesday, February 17, 2009

Painting progress...

I posted some line art last Thursday, and I am slowly turning it into some sort of actual painting.
painting progress

Its coming along. She has "giant head" right now, but I can probably fix it. Or just burn it if I can't. ;-) I am liking it less the more I look at it, but I am trying to not be all Debbie Downer about it.

My dude switched to night shift this week and its making me all weird! I don't know when to eat my meals. A voice in my head says "When you're hungry dummy!" but that is easier said than done. Watching someone eat dinner hours after I ate mine is torture!!

Tomorrow I have finished paintings to post and list! Yay!

Monday, February 16, 2009

Today is pointless.

Its one of those days I can't make myself do anything worthwhile. I have some pouches to photograph, bookmarks to make, whatever, don't want to. I feel like moping today.

So I started a totally pointless painting. No plan, no direction, just paint and pencil on canvas. Its an exercise in uselessness. I am not trying to challenge myself or illustrate something. Its just because I want to do it...

DSC06466

It may be beautiful, it may be horrible and get painted over before 10pm tonight. But at very least, I am doing something. And today, that is a victory.

DSC06469

P.S. Hello 50 followers! (Thanks Rachel!!) Its such a cute little number. Makes me feel quaint. Maybe someday I will have 50 000 like some blogs. Maybe interesting content will go out of style and complaining and pictures of half finished artwork will come into vogue. YES.

Wednesday, February 4, 2009

She was only 39...

A horrible tragedy!

I mourn.

My hand-me-down sewing machine (from Grandma) might have just bit the big one. My 1970 Singer Touch and Sew 758 gave Gran years of service, and then got trucked down to Toronto with me a few years ago, along with its custom sewing table. For some reason I thought it was just immortal, and would go on working forever and ever...

Stuffy Skeletons!
Here it is in its skeleton making glory. *snifff*

I took it all apart and found that some gears have broken their teeth, and things are just wearing down. I use it to chug through serious fabric, thick felts and velvets and canvas, and hardly ever clean it, so I shouldn't be surprised. Plus Grandma sewed for a family of one billion. I bet if this machine had a notch for every pair of hemmed jeans it would blow your mind.

And it died exactly in the middle of me making a ton of new pouches. Argh! I almost went and got a garbage bag and just threw everything away. I was that annoyed.

So its back to my new sewing machine. I mean, its ok. I guess.

But its plastic, lightweight, small, has a foot pedal instead of knee pedal, a short ass cord, it jams and tangles, and its loud. I just really loved the solid heavy old machine that would sew through anything (including my entire finger!)

So I am grumpy. I should never have praised my grannie-machine on Twitter. I cursed myself!

I am going to see if the old one can be fixed, but gear replacement from a vintage machine shop is at least $70. I can get a whole new (1970) Touch and Sew on Ebay for $80. Will mull it over. Its not so much the money as the "this machine is ancient and must pass away" that is making me grouch.

That is the end of my complaining blog. Go about your business...