Showing posts with label batcat. Show all posts

Wednesday, March 18, 2020

Batcat Colouring Book Free Download

This is a little colouring book I made in 2008. Yes way back in 2008, kids.


Each image is an ink drawing on paper that I scanned, then brought down to my local copy shop and photocopied. I then brought them home and hand assembled them into little zines. They had a glossy postcard cover, I think I still have about 100 covers in storage.

It is a very simple little story of a day with Batcat around his house, hanging out with his little mouse friend. I made it mostly for children, this was before adult colouring came back into fashion!


This one is numbered. I don't know if i always did that. I always signed and drew a little batcat though!

In total there are 10 half page illustrations. I recently got the idea from a friend on instagram that it might be a nice time to have activities or colouring things for kids to work on during the self isolation phase of the pandemic. A great idea! These things already exist and why not! I started a Gumroad account and uploaded them.


So you can get them for FREE on Gumroad. This site also has a feature where you can choose an amount to pay to the artist if you feel like it on items like this, so thank you if you choose to add a small amount.

The pages print out on 5 full sheets of paper. I included the colour cover too, so if choose you can make yourself a little book/zine like I used to do. Its family friendly, safe for all ages. Have fun!


Wednesday, March 4, 2020

Repaint of older paintings

Reworking an older painting in Procreate.

https://www.etsy.com/ca/listing/784074147/art-print-batcat-teaparty-8-x-10-secret 

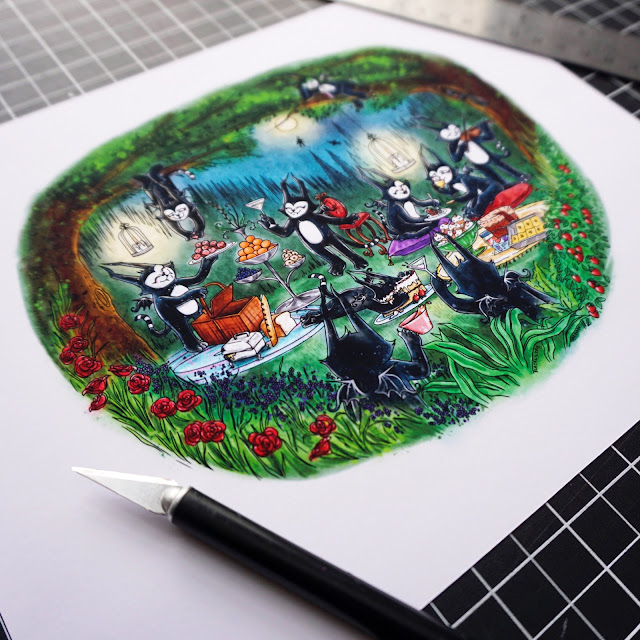
I decided to try a repaint in Procreate on the iPad. I started with my painting of a Batcat Tea Party that I did some time in 2006. I used to sell prints of this on Etsy. The new version is now available.
The older version. It was ink and acrylic paint on illustration board. I don't even know if I still have the original painting of this in a drawer somewhere...

I used to do a lot of painting, both for selling online and even just as personal work, but a few years ago I had a back injury and spinal surgery that made painting in the same way I used to difficult. I don't really do work in this style anymore.

https://www.etsy.com/ca/listing/784074147/art-print-batcat-teaparty-8-x-10-secret 

I didn't spend much time thinking about reworking it in a serious way, just basically using it as a sketch and drawing over top. I only added one element, the batcat in the tree branches drinking a pop. At times I actually thought, that it was like those adult colouring books. But with about 10 layers in Procreate.


A closer look.

I think it was pretty successful! I do miss the gamble of painting. There is so much you don't control, and the best parts of my paintings were always accidental. I LOVE SPLATTERS! But digital painting has a LOT of marks in its favour! Obviously, UNDO. But also its relaxing, you can do it anywhere, you can stop and start with no prep, you can have multiple versions...CATS don't walk on it and leave footprints! And Procreate keeps stats on your work. This took about 20 hours, and had 24,000+ strokes.

I already have a few other images I think I may try repainting. 


Thursday, February 20, 2020

How I make dolls from custom printed fabric

I thought it might be helpful to make a post about how the majority of my dolls are made. Both for people who buy my dolls, and wonder about it what goes into it, and for people who are trying to make their own dolls.

I just took pictures as I was making a Batcat doll that I sell in my Etsy shop.

https://www.etsy.com/ca/listing/574771618

This is my character, which I do a lot of different things with. This doll was designed in Adobe Draw, which I used on my iPad Pro. In reality, most of my dolls are being designed in Procreate on the iPad now. But the process is pretty similar.
Here is in the the app. Its a very simple design. I decided on the body shape and the arms and legs, tail and wings.

Its very easy to get clean black and white designs with this app. You can see I keep things on different layers so I can move them around.

Ok this isn't really a pattern design tutorial, so I am breezing past all the hardest and most important bits of doll making, which is designing the doll and getting everything worked out! I often make a pattern, have it printed, sew it,  then make corrections. Once in a while a doll comes out perfectly but, in my experience there are always some tweaks you want to make.
So obviously if you are going to me trying to MAKE your own doll, expect it to look wonky, too fat, too skinny or something the first time you make one. Its just how it goes.

Ok next step after you draw the doll parts. I upload the image I drew in Adobe Draw to Photoshop on my desktop computer.  I add a light outline and a bleed in the same doll colour around all the pieces. The "outline" isn't necessary if your doll is a more simple design, like straight legs or round head, but for designs that have detail, like those little bits on the side of the batcat's head, I find the outline helpful. I will show you why later on. 

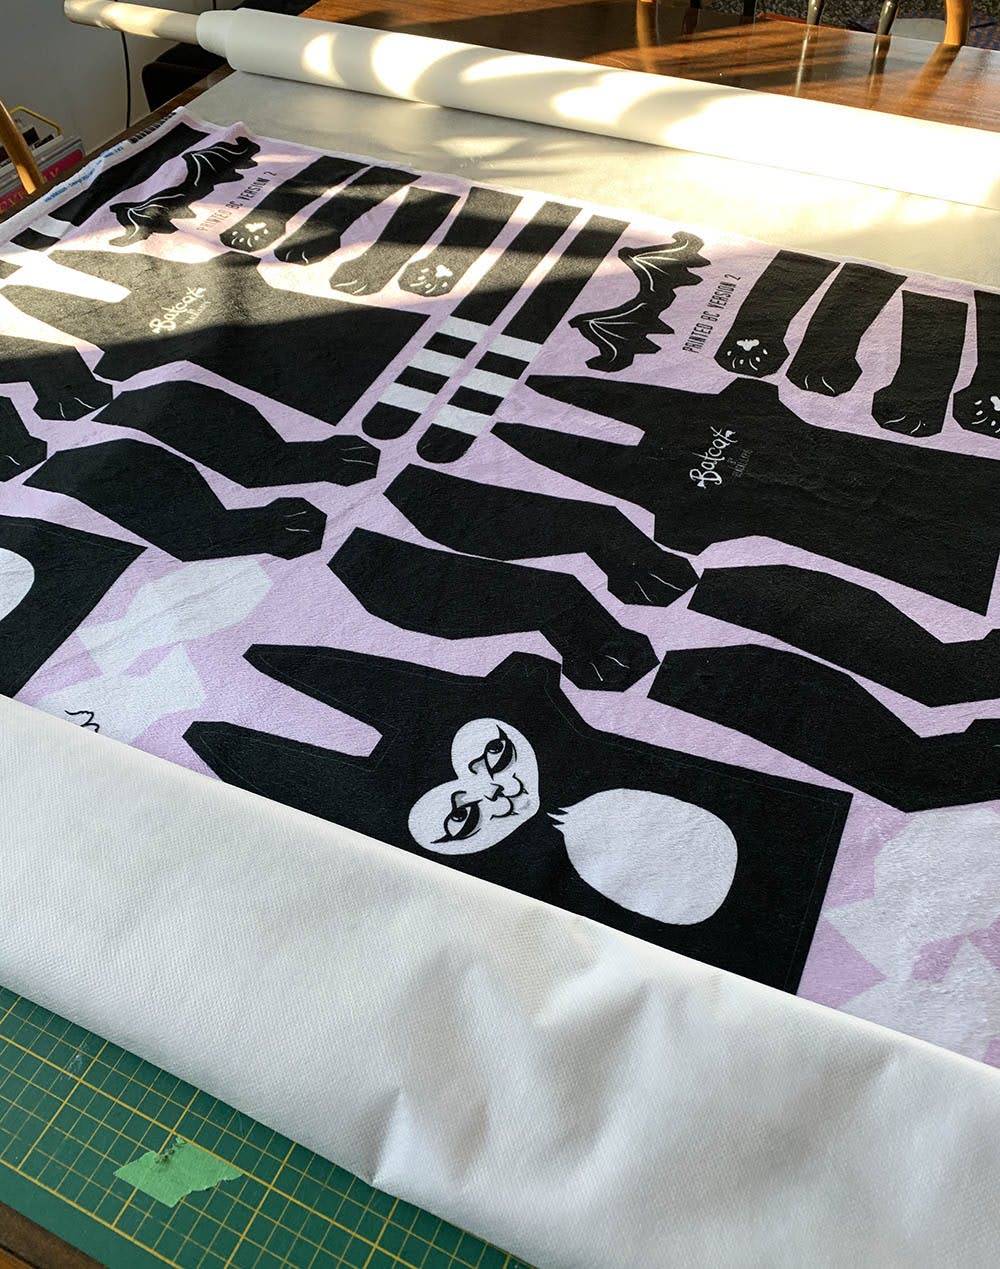
 So once all the doll parts have their bleeds, its time to assemble them in a file to be printed. You can get fabric printed at Spoonflower, which has a lot of different options, so deciding what kind of fabric you would like FIRST before designing this layout is helpful, as they are different sizes. This layout below is for a Fat Quarter (1/4 yard) of Minky fabric.

 You can see there is a front and a back, and each arm and leg and the tail also has a front and back, which are mirror images of each other. The wings are the only part of the doll that one have one piece as I add faux leather as the back. Also a lil seal friend!

You can choose to have only this Fat Quarter printed or you can fill up a whole yard and you get more bang for your buck.

Ok our fabric has arrived! You can see I get it printed by the yard. I wash and dry the fabric as suggested by the manufacturer. Minky looks the exact same after washing. 

Next step I take is backing it with interfacing, which you can see on the roll at the top of the photo. Why do I use this? Minky feels really nice and soft and fuzzy, but its a PAIN to sew. It stretches and is super slippery. It also lets fibers from your stuffing poke through your doll, which when the doll is black looks SO BAD. This solves all these problems and is cheap and easy and will make your life better. You can use any interfacing really I use a sew in one, but I actually spray it with temporary quilt adhesive to make it stick while I am making the dolls. 

I then cut all the pattern pieces out quickly, I will cut some of them out more carefully later as I sew them.
I am going to sew and stuff all the arms, legs, tail and wings before I sew the body.

Here are two parts of an arm. If this was a simple doll with a round hand i would simply pin them together and sew around the edge. 

But this Batcat paw is a bit more complex, he has little fingers. How do I sew that? Well I use my little USB powered lightbox (or I used to pop it up against the window) to trace the outline that I had added in Photoshop to show me where to sew. Another way is to actually sew around the outline on just the top paw piece, which will transfer your line the bottom of the interfacing. 

 I have started using quilt clips to "pin" everything lately and its way better and way faster and just amazing?!? Minky is soooo slippery and these little clips hold on super tight. You can buy them for cheap online, my local Fabricland store has them for 5x the price I paid. 

So I match up the two paw pattern pieces by cutting out the one I traced the sewing line on, and matching it to its partner. I then clip it all and sew around it, leaving the end open for stuffing.

You then have to trim all around it and *carefully* snip into the fabric at every curve so when you turn it right-side out, the fabric can stretch and not bunch up. Just snip carefully in between those batcat toes. Leave about 1mm not snipped so you don't hit your sewing line.


 Here is one turned right-side out. You can see the tools I use for this. I have a Letraset rubbing tool that I have literally used on every doll I have ever made, I stole it from my dad when I was a teenager. Guess its *vintage* now. If you want something like this, there is a tool called "That Purple Thang" that is really similar. I also often use a little pair of pliers along with the Letraset tool. Minky really slides against itself well, so turning things right-side out is actually really easy.


I do the same process with the wings but use a piece of faux leather. This is really unforgiving and a total PAIN to turn right-side out. Do not recommend. Also cannot use pins at all with this fabric, as the pin holes will show. So right sides together, sew around the shape and leave a little place for turning right-side out.


 All the parts are sewn and stuffed (plus a bunch of random other Crow doll legs.) After they are stuffed I quickly sew the tops closed. No need to be careful or pretty about it as that part is hidden inside the doll.


Moving on to the body of the doll. I have started attaching the dolls wings and tail at this stage, but you can certainly do it after by hand sewing them on. I did that for most of my dolls for years.
You cans see that Minky fabric makes TONS of fuzzies. Your house and clothes will be a mess.


Ok If you haven't made a doll before, here is probably where you are like, what is happening?? 
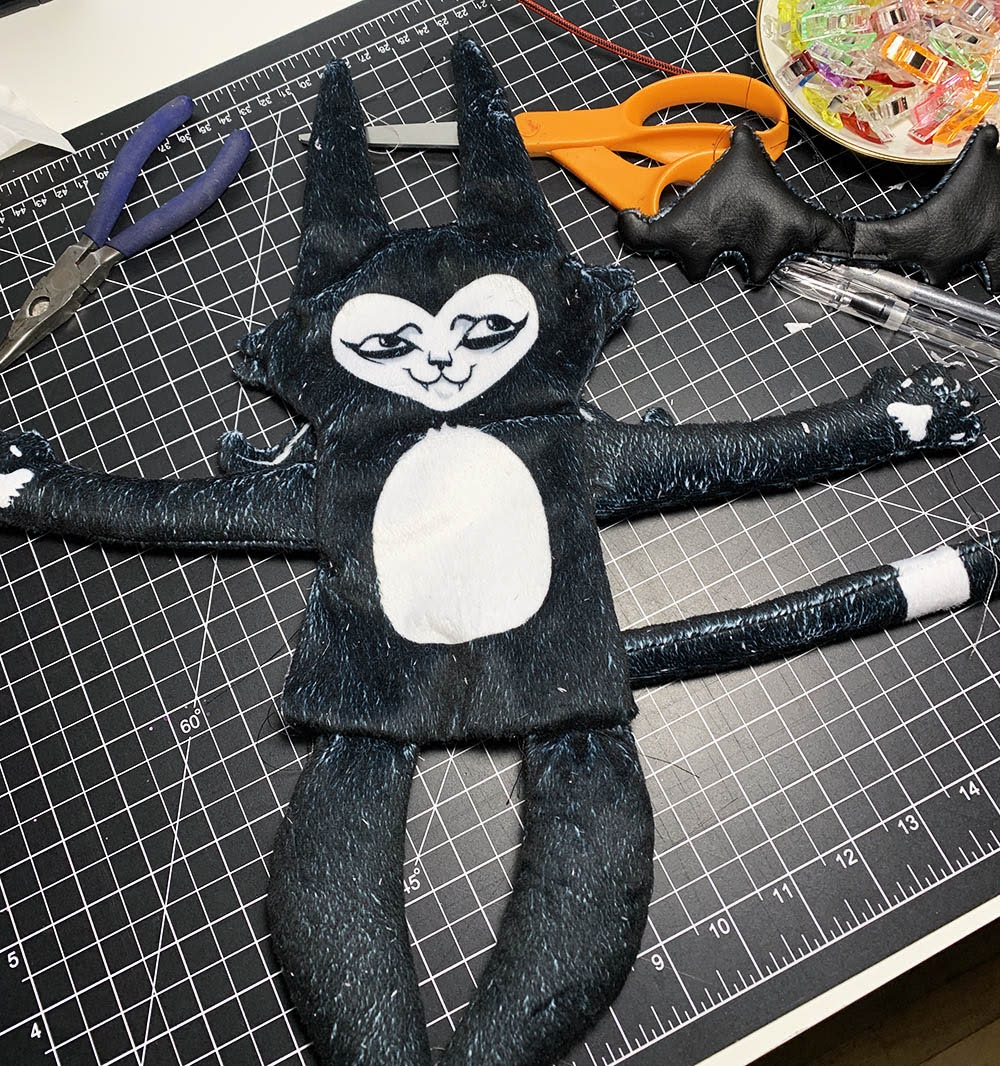
I have matched up the front and back body of the doll and sewn around the perimeter BUT leaving arm and leg holes. PLUS I left one small opening (look where the tail is coming out of the side of the body) open for stuffing. Make sure if you attached things like the wings or tail already that they don't get caught up inside when you sew. 

This part can get tricky.  Since you are making this doll inside out, legs and arms can easily get sewn in backwards. Take a minute with each doll part you sew in and think about how it will be when it is turned the right way out. I honestly some times have to  think of my own body folded like this doll is. I have made hundreds of dolls by now and I can still make errors.

You can think of it like "the front of the legs should be touching the front of the body" while I am sewing it. Same for the arms. You will understand when you do it the wrong way round by accident!


Here is where I am going to add the leg. Imagine this same position, but the leg is stuffed inside the doll. I then sew across the line I have traced.


This is the point where you will become super annoyed. (And also start thinking, why did I decide to make a blog post about this mess??) Anyway, each arm and leg has been sewed in its proper place, and each one makes it more difficult as there is only so much room in an inside-out doll. But just sew one one at a time. You may need to have some arms and legs poking out of the stuffing hole while you sew. 
 THEN clip the curves like you did with the arms and legs, this is super important and the doll will not look nice unless you ease any curves. 

Then pull them all out through the hole while you hold your breath.....


PHEW! Everything is in the right place and it looks great! Its the evening now so the photo makes it look a bit scruffy, but you can brush him up a bit and it all gets nice and black again. Now just stuff through the stuffing hole you left, and do a nice and neat stitch by hand to seal up the hole. Minky is pretty forgiving in this way as well.


Here it is! 

Hope this helped you understand how my doll is made. I have made A LOT of them, but I use only a normal household sewing machine and you can get all these materials at your local fabric store. You could do the same sort of doll and give it a hand sewn or drawn face. If the "sewing the legs while inside out" part is super scary, just hand sew the legs on the outside. 

Just remember you can use the seam ripper if you do something wrong! I certainly do. 


Wednesday, September 10, 2014

Lets wreck some something!

My partner just up and exclaimed that our nightstands were friggan' ugly. I kind of agreed. They are standard ikea ones, a kinda greyish white striated finished laminate. They had also seem better days. 

Why did we even buy them??! 
We hate them now. 
SO lets wreck them!!

before Ikea nightstands DIY by http://blacklilypie.blogspot.ca
 Ugh, so boring. The laminate is peeling a bit from those bottom cut outs too. I peeled off any edges of laminate that were sticking out, glued and filled the edges then sanded them. Then I  took off the doors and the little shelf.

Painting Ikea nightstands DIY by http://blacklilypie.blogspot.ca
The internet is like "Oh use chalk paint, its the best" I TRUSTED YOU INTERNET. Ok, I am sure chalk paint is great when you get the right materials, but my DIY plaster/paint mix was chunky AND translucent and pretty much garbage. But we are WRECKING these things, so no matter, just try and make it pretty smooth, and do a few coats and it will alllll work out...

Painting spatters on Ikea nightstands DIY by http://blacklilypie.blogspot.ca
Oh, did you like that subtle, chalky finish? That is great but ohmygosh so dull. Lets wreck it more by dripping black inky paint on it. Also use a straw, dip it in paint then blow forcefully through it to get amazing spatters. Let each side dry before moving it.

Painting clear coat on Ikea nightstands DIY by http://blacklilypie.blogspot.ca

Hey, that is pretty neat actually.
Ok, now once it is all dry you have to clear coat it. I used a satin polycrylic with a pretty small brush. Do a few coats (let each one dry) especially on the top where it will get wear.

Final painted Ikea nightstands DIY by http://blacklilypie.blogspot.ca
Ok, they are pretty weird.
But they are SO MUCH BETTER than the boring ikea grey joykillers. I didn't even have to change the knobs like I thought I would, because they disappear. YAY.

Final chalk painted Ikea nightstands DIY by http://blacklilypie.blogspot.ca

Now we can relax. 

If you are thinking of trying questionable projects, you can't beat using an old Ikea piece as a starting point. Literally every step of this was a disaster, but I pressed on and the end product is super neat! 

The nightstand update is literally the first thing I did to my standard beige rental bedroom. Better find some more stuff to DIY/wreck...

Monday, March 30, 2009

cat-ish things...

I put two stationery sets in my shop today. I have been doing some gloomy or dark stuff lately, so I bet some people will be happy to see something fluffier for a change.

batcat zoom stationery

This batcat stationery is a modern makeover of one I designed in university. Batcat has gotten a 2009 update, but everything else is pretty much the same. I packaged them nice and small to make them easier to ship. (Easier means cheaper too!)

batcat zoom stationery

Not really all that proud of my photography on these babies, but what else is new. I guess I shouldn't publicly point out that they are photographed poorly. Forget I said anything. The overcast days make my photos so dreary. Which is fine when they are supposed to be dreary!

So now I am working on something new. Look at this bad boy!

Work in progress screenshot

Heee heee! My favorite part is the chewed ears! I might have to make that more of a feature.

This is just the first rough part of blocking in the shapes. He will have his fur and features tweaked soon enough...He is an Illustrator drawing, and I will show you the rest of him when the project comes together... P.S. Think I have enough icons in my dock??? Haha.

Tuesday, March 3, 2009

Batcat Birthday.

I made a card.

batcat birthday card 1

Batcat birthday card! I used to have another Batcat design in my shop but it wasn't vibrant enough for me. So this is the re-do. I wanted to do a card that also had a an interior image too...

batcat birthday card 2

I added a little space to write your b-day message inside.

I think its a bit funny that I did a birthday card, since I don't even really like birthdays. I totally get kids birthdays, and the big ones like 30 or 40 or 100. But I could cut the rest and be fine with it. Sometimes I think being one of the people who doesn't particularly like birthdays sets off peoples "lets buy a cake!" alarms. SIGH.

For years now I have been trying to care about other people's birthdays, because I know everyone isn't like me but I really suck at it. Sorry everyone! There is always next year for me to do better. :-) When you are 100 I will get a skywriter or something insane to make up for it.

I have made one more card, but it might have to wait until tomorrow.

Tuesday, January 20, 2009

Give Batcat a Face!

The new item I sneak peeked a little while ago is ready and in the shop!

batcat body memo


A little Batcat dry erase memo body! I am totally a "write it down or I will forget about it" kind of person. Maybe that is why I really like the idea of dry erase memo boards. Leave a little note, reminding, noting or maybe even teasing. I love finding notes to me from people, its super fun!

Like check this out...
blackboard 1

This is a blackboard in my bathroom that people can write cute stuff on. Washroom graffiti! It needs desperately to be repainted due to the humidity of my crappy washroom, but that has to be done outside. I will have to wait until spring.

My dad made this "dog" for my brother when was a little kid, in the shape of his imaginary friend/dog. Imaginary dogs don't have to be dog shaped you know. I bet it you its over 20 years old now. HOLY.

blackboard 2

If I had my way I would have note leaving places all over my house. You never know when you have to draw a taco cat, or remind people about Halloween.

In fast I have a few notes in front of me that say "butternut squash," and "wallz" (No idea what that one is) and "new bloggitude." Life is sweet.

Tuesday, January 13, 2009

New Lino Print

I finally got around to signing, numbering and packaging a lino print I did before Christmas!

Wild Child Lino print

These are very hand printed looking prints. Haha. They all have their quirks, but that is what makes printmaking charming right? The idea that each print is an original. I used water based ink, which dried too quickly for my slow and shaky printing skills. Its a limited edition of 12.

I already have a new lino block carved and waiting for printing! Just need supplies and I am ready to go nuts.

To mix it up a bit, I am working on a little Batcat project. Here is a little look at it I screen grabbed yesterday.

batcat thingy screen grab

Click here for the huge one... Its not a complicated little thing, its already printed and in "production" mode right now. Sometimes drawing Batcat is more relaxing than work. And this simple little shape might be used for a bunch of different items. He had a bit of tweaking after this screen grab...

I am doing pretty well on my resolutions too. I think eating healthier is much easier now that my Dude pointed out that watching the Food Network all day doesn't help my resolve. Back to crime and murder. Ha ha. I even *gasp* exercised. Plus I have some other original artwork photographed and ready to list. I might even touch outdoor air today. Maybe.

Wednesday, December 3, 2008

It comes from the diaphragm. OF HELL.

Sometimes I get a laugh out of myself.

I am sitting in my studio, dancing around to dudes screaming about eternal suffering or something about life being a deep pit of horrible despair, while photoshopping bright pink backgrounds of the adorable kitty stickers I drew.

Batcat Stickers

If I ever get my own house I am going to build a soundproof room in the basement where I can perfect my metal guy scream. And paint it piiiiink.

Tuesday, October 14, 2008

Its ready!!

I heart my colouring book!


I think it came out really well. It was fun to do too. I might have to start a second book right away!

Its a little 10 page black and white book, with a glossy cover. Each little book was hand assembled, has an original little Batcat doodle, signature and number. So each little kiddie, or big kiddie feels like they have something super special.


If I never sell one, I don't even care, because I am think they came out so sweet. (Ok, I would still like to sell some. haha!)

There was some discussion on whether I should use the US or the Canadian spelling of 'colour', especially since it was definitely for children, and almost all my audience is in the states. But when it comes down to it, I am a Canadian, Batcat is a Canadian, and that is how we spell colour! :-) I think the world will survive my choice.

P.S. Do you like Batcat's new buddy? He is a cute little Rat, as Batcats only eat cakes and pastries, not rodents.