Showing posts with label etsy. Show all posts

Thursday, February 20, 2020

How I make dolls from custom printed fabric

I thought it might be helpful to make a post about how the majority of my dolls are made. Both for people who buy my dolls, and wonder about it what goes into it, and for people who are trying to make their own dolls.

I just took pictures as I was making a Batcat doll that I sell in my Etsy shop.

https://www.etsy.com/ca/listing/574771618

This is my character, which I do a lot of different things with. This doll was designed in Adobe Draw, which I used on my iPad Pro. In reality, most of my dolls are being designed in Procreate on the iPad now. But the process is pretty similar.
Here is in the the app. Its a very simple design. I decided on the body shape and the arms and legs, tail and wings.

Its very easy to get clean black and white designs with this app. You can see I keep things on different layers so I can move them around.

Ok this isn't really a pattern design tutorial, so I am breezing past all the hardest and most important bits of doll making, which is designing the doll and getting everything worked out! I often make a pattern, have it printed, sew it,  then make corrections. Once in a while a doll comes out perfectly but, in my experience there are always some tweaks you want to make.
So obviously if you are going to me trying to MAKE your own doll, expect it to look wonky, too fat, too skinny or something the first time you make one. Its just how it goes.

Ok next step after you draw the doll parts. I upload the image I drew in Adobe Draw to Photoshop on my desktop computer.  I add a light outline and a bleed in the same doll colour around all the pieces. The "outline" isn't necessary if your doll is a more simple design, like straight legs or round head, but for designs that have detail, like those little bits on the side of the batcat's head, I find the outline helpful. I will show you why later on. 

 So once all the doll parts have their bleeds, its time to assemble them in a file to be printed. You can get fabric printed at Spoonflower, which has a lot of different options, so deciding what kind of fabric you would like FIRST before designing this layout is helpful, as they are different sizes. This layout below is for a Fat Quarter (1/4 yard) of Minky fabric.

 You can see there is a front and a back, and each arm and leg and the tail also has a front and back, which are mirror images of each other. The wings are the only part of the doll that one have one piece as I add faux leather as the back. Also a lil seal friend!

You can choose to have only this Fat Quarter printed or you can fill up a whole yard and you get more bang for your buck.
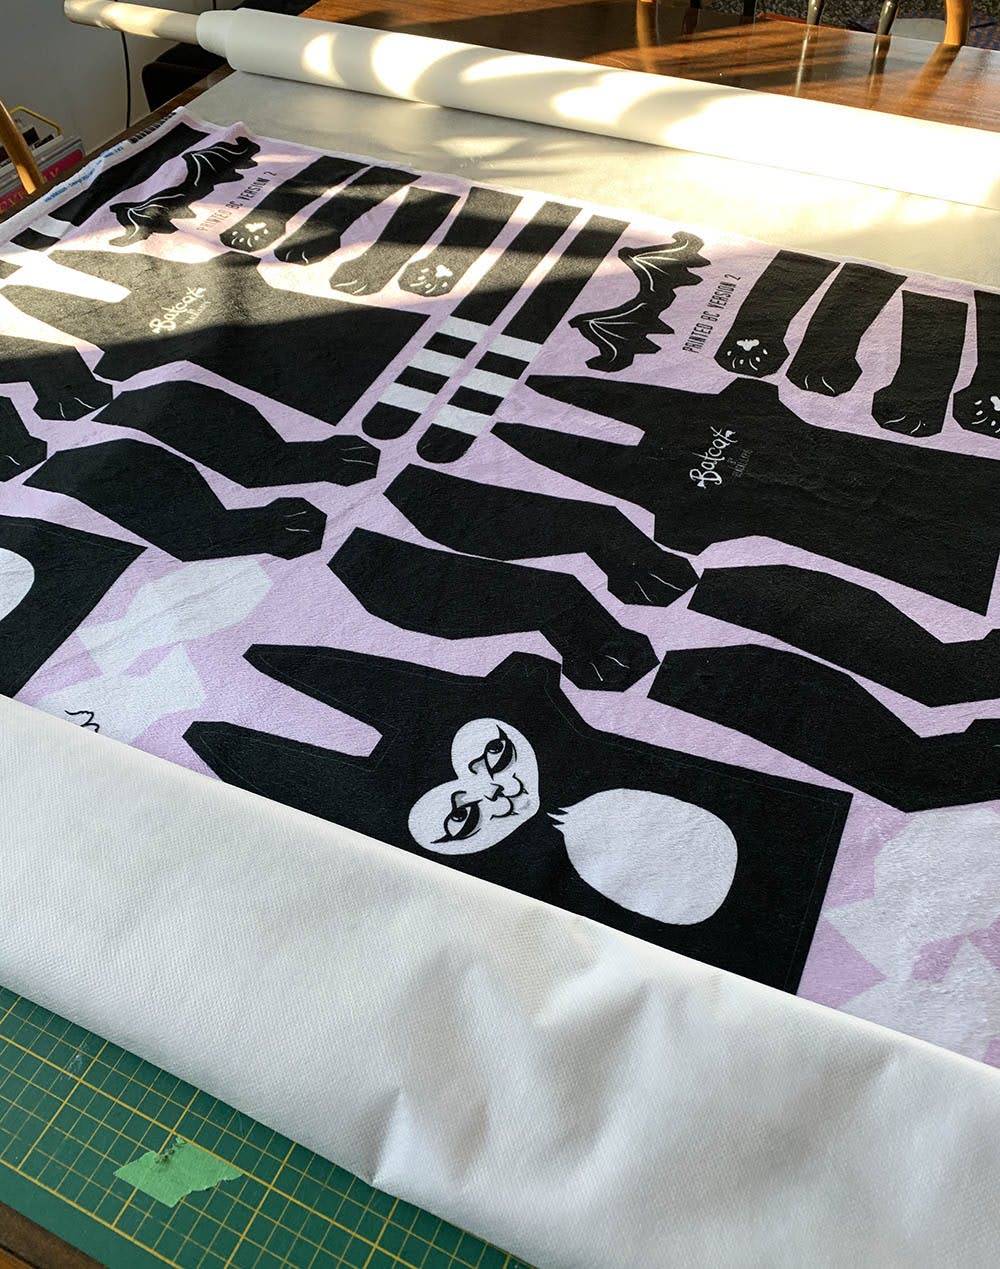
Ok our fabric has arrived! You can see I get it printed by the yard. I wash and dry the fabric as suggested by the manufacturer. Minky looks the exact same after washing. 

Next step I take is backing it with interfacing, which you can see on the roll at the top of the photo. Why do I use this? Minky feels really nice and soft and fuzzy, but its a PAIN to sew. It stretches and is super slippery. It also lets fibers from your stuffing poke through your doll, which when the doll is black looks SO BAD. This solves all these problems and is cheap and easy and will make your life better. You can use any interfacing really I use a sew in one, but I actually spray it with temporary quilt adhesive to make it stick while I am making the dolls. 

I then cut all the pattern pieces out quickly, I will cut some of them out more carefully later as I sew them.
I am going to sew and stuff all the arms, legs, tail and wings before I sew the body.

Here are two parts of an arm. If this was a simple doll with a round hand i would simply pin them together and sew around the edge. 

But this Batcat paw is a bit more complex, he has little fingers. How do I sew that? Well I use my little USB powered lightbox (or I used to pop it up against the window) to trace the outline that I had added in Photoshop to show me where to sew. Another way is to actually sew around the outline on just the top paw piece, which will transfer your line the bottom of the interfacing. 

 I have started using quilt clips to "pin" everything lately and its way better and way faster and just amazing?!? Minky is soooo slippery and these little clips hold on super tight. You can buy them for cheap online, my local Fabricland store has them for 5x the price I paid. 

So I match up the two paw pattern pieces by cutting out the one I traced the sewing line on, and matching it to its partner. I then clip it all and sew around it, leaving the end open for stuffing.

You then have to trim all around it and *carefully* snip into the fabric at every curve so when you turn it right-side out, the fabric can stretch and not bunch up. Just snip carefully in between those batcat toes. Leave about 1mm not snipped so you don't hit your sewing line.


 Here is one turned right-side out. You can see the tools I use for this. I have a Letraset rubbing tool that I have literally used on every doll I have ever made, I stole it from my dad when I was a teenager. Guess its *vintage* now. If you want something like this, there is a tool called "That Purple Thang" that is really similar. I also often use a little pair of pliers along with the Letraset tool. Minky really slides against itself well, so turning things right-side out is actually really easy.


I do the same process with the wings but use a piece of faux leather. This is really unforgiving and a total PAIN to turn right-side out. Do not recommend. Also cannot use pins at all with this fabric, as the pin holes will show. So right sides together, sew around the shape and leave a little place for turning right-side out.


 All the parts are sewn and stuffed (plus a bunch of random other Crow doll legs.) After they are stuffed I quickly sew the tops closed. No need to be careful or pretty about it as that part is hidden inside the doll.


Moving on to the body of the doll. I have started attaching the dolls wings and tail at this stage, but you can certainly do it after by hand sewing them on. I did that for most of my dolls for years.
You cans see that Minky fabric makes TONS of fuzzies. Your house and clothes will be a mess.


Ok If you haven't made a doll before, here is probably where you are like, what is happening?? 
I have matched up the front and back body of the doll and sewn around the perimeter BUT leaving arm and leg holes. PLUS I left one small opening (look where the tail is coming out of the side of the body) open for stuffing. Make sure if you attached things like the wings or tail already that they don't get caught up inside when you sew. 

This part can get tricky.  Since you are making this doll inside out, legs and arms can easily get sewn in backwards. Take a minute with each doll part you sew in and think about how it will be when it is turned the right way out. I honestly some times have to  think of my own body folded like this doll is. I have made hundreds of dolls by now and I can still make errors.

You can think of it like "the front of the legs should be touching the front of the body" while I am sewing it. Same for the arms. You will understand when you do it the wrong way round by accident!


Here is where I am going to add the leg. Imagine this same position, but the leg is stuffed inside the doll. I then sew across the line I have traced.


This is the point where you will become super annoyed. (And also start thinking, why did I decide to make a blog post about this mess??) Anyway, each arm and leg has been sewed in its proper place, and each one makes it more difficult as there is only so much room in an inside-out doll. But just sew one one at a time. You may need to have some arms and legs poking out of the stuffing hole while you sew. 
 THEN clip the curves like you did with the arms and legs, this is super important and the doll will not look nice unless you ease any curves. 

Then pull them all out through the hole while you hold your breath.....
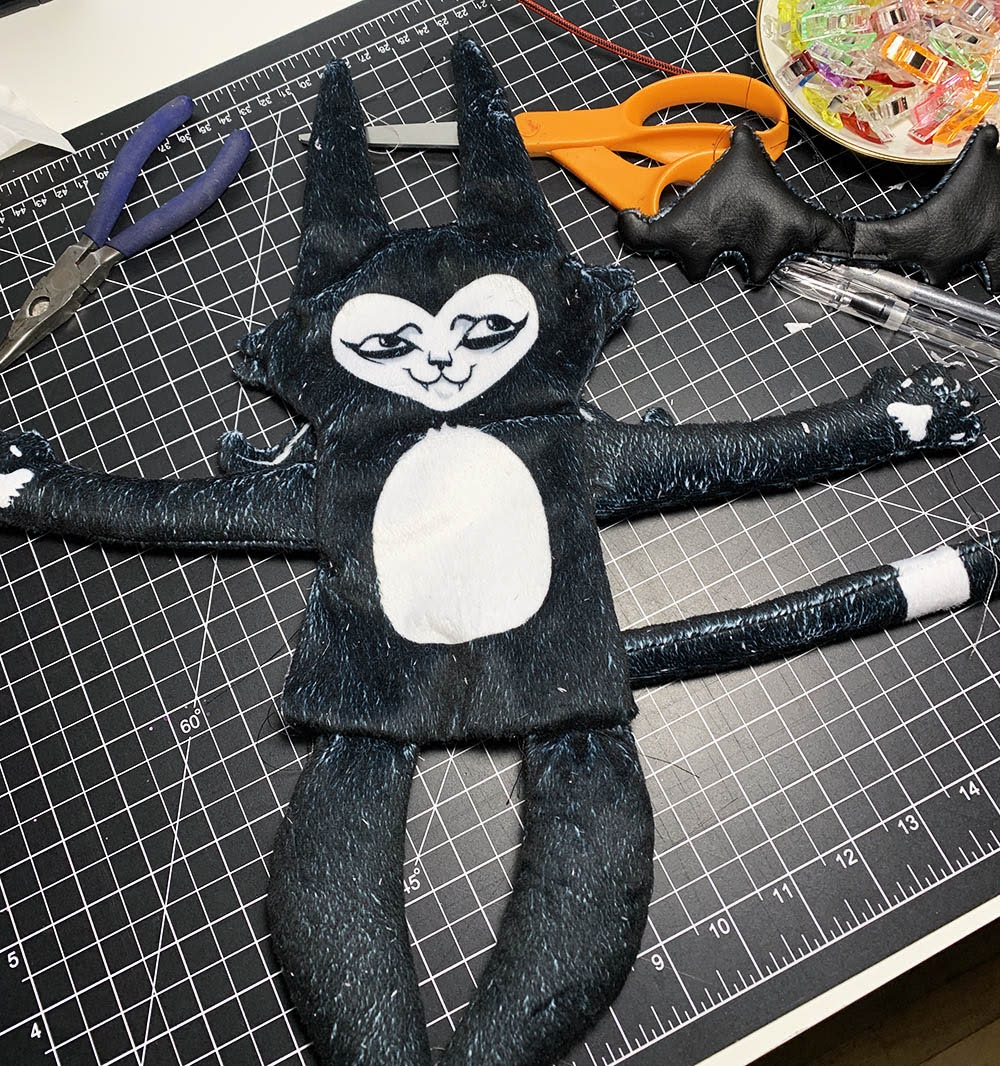

PHEW! Everything is in the right place and it looks great! Its the evening now so the photo makes it look a bit scruffy, but you can brush him up a bit and it all gets nice and black again. Now just stuff through the stuffing hole you left, and do a nice and neat stitch by hand to seal up the hole. Minky is pretty forgiving in this way as well.


Here it is! 

Hope this helped you understand how my doll is made. I have made A LOT of them, but I use only a normal household sewing machine and you can get all these materials at your local fabric store. You could do the same sort of doll and give it a hand sewn or drawn face. If the "sewing the legs while inside out" part is super scary, just hand sew the legs on the outside. 

Just remember you can use the seam ripper if you do something wrong! I certainly do. 


Sunday, January 19, 2020

Double Sided Bunny Doll


Two Sided Black and White Bunny Rabbit Doll! 

I made this doll last year. I was wanting to do a doll with two different faces and this one is ...sort of that, it has the same bunny but opposite on either side. It turned out GREAT!

This year I decided to size up the pattern, because it was just so teeny tiny (THOSE SKINNY EARS! THOSE TINY TOES! They were so hard to turn right side out after sewing!) and the whole thing was hard to sew. Plus I just think its better bigger! I think it worked well before but its so much more big and floppy and satisfying now.


The original smaller doll beside the new, larger size. I didn't change anything really, just printed it at a larger size on the fabric. I actually draw my dolls at a huge size then downsize them for printing, just in case I want to make them larger some day.

I personally think its one of my better dolls, but that is just preference, because I made this for me! Often the dolls I like the most are not the most popular ones. who knows why? Like all my printed fabric dolls, I made this to be in stock continuously, I can make as many as I want.

Here is the pencil sketch I took a photo of with my iPad.

I drew the bunny in Procreate on the iPad, with an Apple Pencil. In the past I would have used Illustrator for this sort of thing, but using Procreate worked really well! I actually created the bleed around each piece in Procreate, kind of drawing them separately then "assembling" the bunny you see above from the individual pieces. 

I then send it to my computer so I can work on the pattern layout in Photoshop. I lay them out in a file that is the size of a yard of minky fabric. I try and keep all the legs going in the same direction so the fabric lays the same way when its assembled.


I try and squeeze as many dolls as possible onto my yards of fabric, so sometimes this step can take a while.

I might do a more in depth post about how I actually cut and sew each of my dolls in the future. I have it down now, I have made A LOT of dolls this way lately.

 
This doll is available at my Etsy shop! If its currently sold out you can click the restock button to be notified when I get another one in stock. You aren't obligated, it just gives you a heads up. Thanks for visiting!


Friday, November 8, 2019

Spooky Skeleton Cat Dolls


A new pattern test today!

Two spooky skeleton cat dolls are fresh in the blacklilypie etsy shop today. 

 These dolls are a slight variation on my Soft Skeleton Doll that I have been making for a few years.

The green eyed one has a green spatter all over him, on the back as well. 


Sometimes pattern tests come out with a lot of little quirks that have to be ironed out. I mean, that is why you do a test...but once in a while a doll comes out perfectly, exactly how you wanted it to on the first try. Even though I started with my older skeleton pattern, I still drew this one out in full in Adobe Illustrator.

I think I might do a few more colour variations of this doll. I like how the spatter pattern makes the black and green one feel special. A halloween themed one? White cat body with pink bones? 

If you want to look at more photos, or buy a skeleton cat, go to my Etsy shop. If the doll is currently sold out, you can click to be notified by email when its back in stock.


Thursday, October 24, 2019

Crow Doll

Working my way through creating all my fave animals... and obviously its CROW TIME.

This crow doll was drawn on the iPad, with the Apple Pencil, using the Procreate App. I did a test doll, then tweaked him a bit from this original drawing, making him a bit fatter.

 
I had the pattern printed on minky fabric, which is super soft and cuddly. I use this for all my dolls right now because it just feels so great.


He is a two sided doll, the back and front are the same except for the heart on his bum with my label. Its part of the doll, not an added label. The tail usually hangs down and covers it though. 

His best part is his Edward Gorey sneakers.  Fashioned after The Doubtful Guest I think.

He is entirely made by hand. I cut the pattern parts, sew and stuff each one in my studio. Hi is about 18 inches wide (45 cm wide)

If you are interested in buying one of these dolls, I tend to make small batches at a time. If its currently sold out on Etsy, you can make a restock request by clicking "Let me know when it's back" and you will get an email when I make more.


Monday, April 22, 2013

Art Doll - Blue Cat

I thought it would be interesting to paint a doll before sewing it. This is my little test guy.

I made a rough pattern out of paper first, then traced it on the fabric. This would be the basic ink outline. I didn't really plan what he would end up looking like,  this was more of a "figure out how this is going to work" scenario.

painted art doll in progress

I mixed my acrylic with fabric medium, so when it was complete I would be able to heat set it.

painted art doll in progress closeup
I found that I had to build up layers so it wouldn't all run together in a soggy mess (although sometimes that is EXACTLY what looks the best.) I did thin washes and spatters, blasted them with my dryer (which I always use when I paint) And slowly built up this little guy's face.

After painting all the parts, and heat setting them with an iron,  I cut them out with a seam allowance. Then I used a piece of black cotton the same size and sewed alone the outline with right sides facing each other. Get it? 
I left the toes and wrists open and added little hands and toenails. Then stuffed it.
I initially was going to have the limbs be fixed to the body but I thought it would be nice if he could sit or hang out like a cool cat. So I attached the limbs with thread, kind of like you attach a button to a shirt.

painted cat plush final
I think he turned out quite good for a test run! His feet are my favorite part.
Little Blue Cat is available in my Etsy Shop right now. I am planning to make a few more critters now with this format, its a nice combo of painting and sewing for me.

Thursday, March 28, 2013

Heat Transfer Patches

I had some heat transfer paper squirrelled away, and I decided on a whim to try to make some heat transfer things.

I took a bunch of images I had created lately and printed them on the inkjet transfer sheets. I had a few Dark T-shirt sheets, and a few Light T-shirt ones. I generally like the Dark T-shirt ones better because I use a lot of dark fabric, and I like pressing it onto black cotton. But the Light T-shirt ones work well for certain images. It was also way easier to press with the iron and peel the backing paper off.

Tip: Make sure you use a de-fuzzing sticky roller or something to remove fluff from the fabric before ironing. Even the most microscopic bit of fuzz will be super visible on the white parts of the image after you iron it. Go crazy on the fabric and brush off the transfer with a dry paintbrush.


I thought I would include some pics of my horrible failures. You know, so you can feel better about yourself. I mixed up The Dark and Light T-shirt transfers when pressing them, and since they have different processes, this happened. That black and white teapot is part of the disaster sheet.

The full page tea set was going to be a zipper pouch, but I neglected to remember that after sewing a zipper pouch, you press it flat, and you cannot iron a transfer once its set on paper. So...I am going to make something else with the tea set. Appliques probably.

So once the transfer was on fabric, I backed it in black cotton and zig zag stitched around the outside. My early 2000's Singer did not like to do this at all. But my early 1970's Singer just breezes through.

I made a few, photographed them and listed a couple of them in my Etsy Shop. I am keeping the "1st Place in Disinterest" for my own jacket, because I try not to care about things that are stupid. Its a lifestyle.
So I guess the experiment was a partial success. The images look crisp and they are nice and flexible. I still think this counts as a "test batch" though as none of them are quite perfect. 

Heat transfers are fussy, and its easy to mess up, and every time I make a project with them there are some failures. So if you try it, and royally screw up some images, just remember this post and then immediately go and eat a cookie.