Showing posts with label process. Show all posts

Wednesday, September 10, 2014

Lets wreck some something!

My partner just up and exclaimed that our nightstands were friggan' ugly. I kind of agreed. They are standard ikea ones, a kinda greyish white striated finished laminate. They had also seem better days. 

Why did we even buy them??! 
We hate them now. 
SO lets wreck them!!

before Ikea nightstands DIY by http://blacklilypie.blogspot.ca
 Ugh, so boring. The laminate is peeling a bit from those bottom cut outs too. I peeled off any edges of laminate that were sticking out, glued and filled the edges then sanded them. Then I  took off the doors and the little shelf.

Painting Ikea nightstands DIY by http://blacklilypie.blogspot.ca
The internet is like "Oh use chalk paint, its the best" I TRUSTED YOU INTERNET. Ok, I am sure chalk paint is great when you get the right materials, but my DIY plaster/paint mix was chunky AND translucent and pretty much garbage. But we are WRECKING these things, so no matter, just try and make it pretty smooth, and do a few coats and it will alllll work out...

Painting spatters on Ikea nightstands DIY by http://blacklilypie.blogspot.ca
Oh, did you like that subtle, chalky finish? That is great but ohmygosh so dull. Lets wreck it more by dripping black inky paint on it. Also use a straw, dip it in paint then blow forcefully through it to get amazing spatters. Let each side dry before moving it.

Painting clear coat on Ikea nightstands DIY by http://blacklilypie.blogspot.ca

Hey, that is pretty neat actually.
Ok, now once it is all dry you have to clear coat it. I used a satin polycrylic with a pretty small brush. Do a few coats (let each one dry) especially on the top where it will get wear.

Final painted Ikea nightstands DIY by http://blacklilypie.blogspot.ca
Ok, they are pretty weird.
But they are SO MUCH BETTER than the boring ikea grey joykillers. I didn't even have to change the knobs like I thought I would, because they disappear. YAY.

Final chalk painted Ikea nightstands DIY by http://blacklilypie.blogspot.ca

Now we can relax. 

If you are thinking of trying questionable projects, you can't beat using an old Ikea piece as a starting point. Literally every step of this was a disaster, but I pressed on and the end product is super neat! 

The nightstand update is literally the first thing I did to my standard beige rental bedroom. Better find some more stuff to DIY/wreck...

Tuesday, August 26, 2014

Sometimes Screwups

Sometimes screw ups happen.

I just completed a design called Skull Feels. Nine skulls with different expressions, pretty straightforward right? NOPE.


Sometimes it takes a while to get to where you want to be. This design had some screw ups, which I worked on, and I think it came out good in the end.

Here is an example of the final products I made with this design.
See it all turned out ok.  The background of these items (except for t-shirts) have a faint bones pattern that you can see up close. These things are available at my Redbubble shop. You can see bigger and clearer images of A TON of items I put this design on.

Ok, so lets get to the screw ups parts of this post. (Under the cut)

Friday, June 27, 2014

Papier Mache Bat with Donut

That damn bat just stole my donut.
Papier Mache Bat and Donut (blacklilypie.blogspot.com)
I just finished and listed this papier mache bat with a wire skeleton. The donut (and his feet) are hinged to his body, so it kind of swings back and forth.

Here are some process photos...
My super elaborate idea sketch. Hahaha.

Papier Mache Bat and Donut process shot (blacklilypie.blogspot.com)

I really should have taken one at the skeleton stage, but anyway...Here is his unpainted body when I was adding the feet. I Added another few layers of papier mache and then sanded it.

Papier Mache Bat and Donut painting shot (blacklilypie.blogspot.com)


Base coats.

Papier Mache Bat face painting shot (blacklilypie.blogspot.com)
I drew his face with a pigment liner then put a coat of white overtop for there is just a faint guide to paint from. 

Papier Mache Bat face painting shot (blacklilypie.blogspot.com)

I think this is almost the completed face. I used like, the tiniest brush I had, and then cut most of the bristles off to make it tinier. Then sealed it with varnish before doing the rest of the sculpture. 

bat wing painting resist shot (blacklilypie.blogspot.com)
The wings I gave a weird crack/resist effect. You only get one shot at it! Painting over a wet layer, so it kind of breaks and resists the paint as the bottom layer dries. Also because he is not flat I basically had to do each wing segment at a time so it wouldn't all run everywhere. Lots of interesting imperfections.

papier mache donut (blacklilypie.blogspot.com)

The donut looks pretty good in real life. Adding a few coats of gloss always helps food art. heh heh.

papier mache bat holding donut (blacklilypie.blogspot.com)
He hangs from an invisible wire that attached to his wing tops. I designed him to be viewable from all sides, so you could hang him from a ceiling.

Its always fun to make these papier mache work, but it takes FOREVERRRR because you have to wait for each coat of stuff to dry. Like,  this was hanging around for weeks. Turned out cute in the end though. He is here.

I want a donut.

Thursday, March 28, 2013

Heat Transfer Patches

I had some heat transfer paper squirrelled away, and I decided on a whim to try to make some heat transfer things.

I took a bunch of images I had created lately and printed them on the inkjet transfer sheets. I had a few Dark T-shirt sheets, and a few Light T-shirt ones. I generally like the Dark T-shirt ones better because I use a lot of dark fabric, and I like pressing it onto black cotton. But the Light T-shirt ones work well for certain images. It was also way easier to press with the iron and peel the backing paper off.

Tip: Make sure you use a de-fuzzing sticky roller or something to remove fluff from the fabric before ironing. Even the most microscopic bit of fuzz will be super visible on the white parts of the image after you iron it. Go crazy on the fabric and brush off the transfer with a dry paintbrush.


I thought I would include some pics of my horrible failures. You know, so you can feel better about yourself. I mixed up The Dark and Light T-shirt transfers when pressing them, and since they have different processes, this happened. That black and white teapot is part of the disaster sheet.

The full page tea set was going to be a zipper pouch, but I neglected to remember that after sewing a zipper pouch, you press it flat, and you cannot iron a transfer once its set on paper. So...I am going to make something else with the tea set. Appliques probably.

So once the transfer was on fabric, I backed it in black cotton and zig zag stitched around the outside. My early 2000's Singer did not like to do this at all. But my early 1970's Singer just breezes through.

I made a few, photographed them and listed a couple of them in my Etsy Shop. I am keeping the "1st Place in Disinterest" for my own jacket, because I try not to care about things that are stupid. Its a lifestyle.
So I guess the experiment was a partial success. The images look crisp and they are nice and flexible. I still think this counts as a "test batch" though as none of them are quite perfect. 

Heat transfers are fussy, and its easy to mess up, and every time I make a project with them there are some failures. So if you try it, and royally screw up some images, just remember this post and then immediately go and eat a cookie.


Friday, July 4, 2008

Something else new.

Its not the sneak peak thing that I posted about before. That isn't quite ready yet...

But! This is a painting process post!

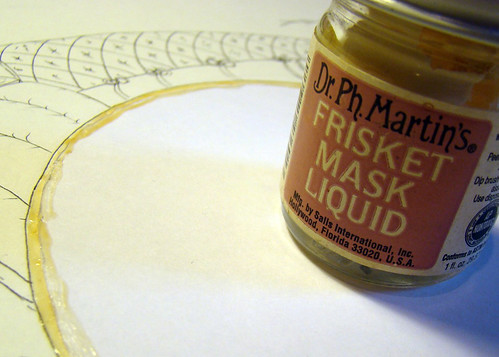
Frisket

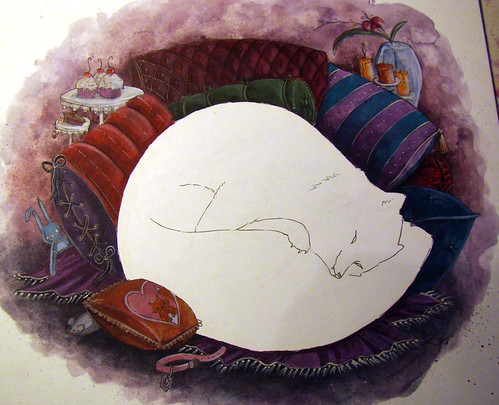
I decided to do a frisket mask on this painting as its of a very white fox surrounded by very deep coloured things. I hate trying to paint out splatter. And I splatter a lot.

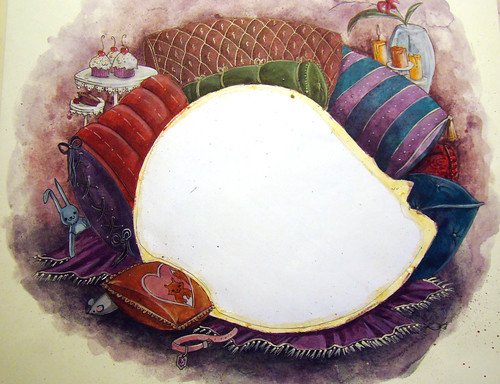
Artwork with frisket

I also made a paper template roughly the size of the fox, which I placed down then glued in place around the edges with the frisket. Then I could go nuts and throw paint around.

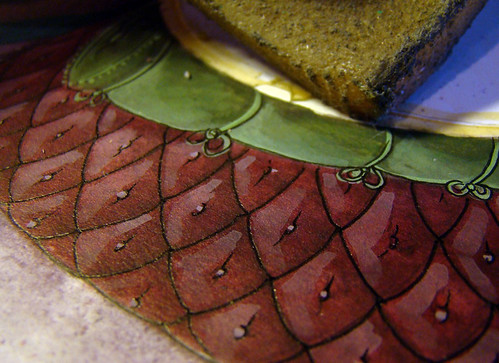
removing frisket 1

After I completed all the pillows and stuff around the fox, its time to lift up my mask. I use this super old and gross pickup that I have had since time began. They don't wear out they just get bigger and grosser. The frisket sticks to it.

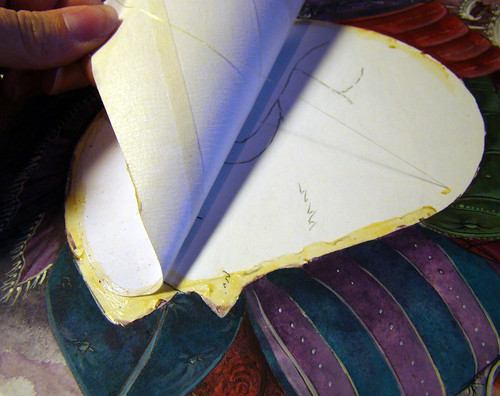
pull up mask

Then pull up my paper mask. Even though it looks messy, its all just yellow frisket and paint on top of it.

clean fox

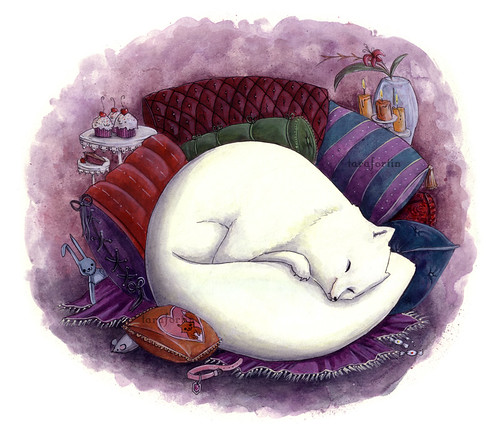
Tah dah! The white fox is still white! No blobs or messes to try and cover. (Ok, not much...) What a cool invention. I just need to add the foxes shadows and its complete.

Finished Art-Spoiled Fox

And there is the final artwork. The most spoiled arctic fox in the world. Its in the shop!

I have officially decided to become a fox collector. I got a stuffed fox on the weekend, and it broke the seal. Fox crazy. And why shouldn't I be? Foxes are the perfect combo of cat and dog. A super animal!

Ok. I will save my Canada Day pictures/new product reveal/fox gushing until next post.